Making Manga: Episode 2 – Designing a Manga Page
In today’s episode of Making Manga, we will be looking at creating a page, the layoiut and composition and designing the page message using a page from chapter 5 in the new “grydscaen: scout manga” that is currentl in production.
This episode will look at:
- Creating page composition and pencils
- The Inked page
- Page shading using Photoshiop
- Preping to add page dialogue
Creating the pencils and page composition
When I creating a page for the grydscaen manga I look first at the page blocking such as how many panels I want on the page and the feeling I want to convey. I am a total pantser and don’t usually create a storyboard or “name” of thumbnails when planning a page. Most of my content for the scout manga is sourced from an existing grydscaen novek concept. The scout manga is loosely based on the scout novel which is already published so I already know the story.
The first image here is the pencils for this page and the blocking which is the layout of the panels and how I want the page to flow. So here you can see the main character Rom the hacker is prominent, and we see his handheld and at the bottom of the page him in the immersive background.
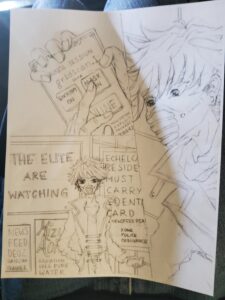
Initial Page Pencils
The traditional inked page
Now I tend to ink all my pages traditionally with gel pens and microns and not digitally in the computer. So page inkiing is a big part of the process. Since my pages are greyscale and I use copics to ink and tone traditionally, the tones, highlights and lowlights are important. In volume 2 I decided to add one red element on the page as a key highlight in this case a key on the handheld.
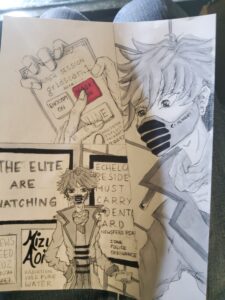
Inked page with text
In this page you can see all the handwritten text with all the posters behind Rom. This is the main page composition.
Final shaded page in Photoshiop
Once I have all the shading done, then I scan the page into the computer and fix the text in Photoshop. Here you can see the final shaded and toned scanned page.
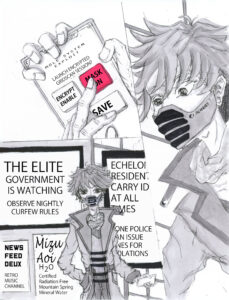
The next step for this page is to add traditionall the screentone to add depth to the page.
Getting pages ready to add dialogue
Now that the basic page is blocked, inked and shaded, the next step is adding the screentone traditionally in anticipated to get ready to add speech bubbles and then add the text next.